Introduction
Welcome to Linux for nonLinux Folks!
Introduction
I seem to spend a considerable amount of time on occasion fixing and/or explaining how to fix Linux for my less knowledgeable friends. Trust me when I say, it is not that these folks aren’t smart enough to use Linux properly.
There are just so many ways you can literally shoot yourself in the foot with any operating system; Linux just gives you the complete toolkit to do said shooting and says “Go have fun!” - normally without any safety mechanisms in place to keep you from harm.
Overview
This set of documents is my attempt to give you some useful advice so you can take care of most of these things on your own without angering your old neckbeard friends who seem to do this stuff in their sleep and always seem cranky.
I fully anticipate some of you will keep asking for my help; think of these documents as a first step in that process.
Who knows, you might learn something useful in here. :smirk:
Structure
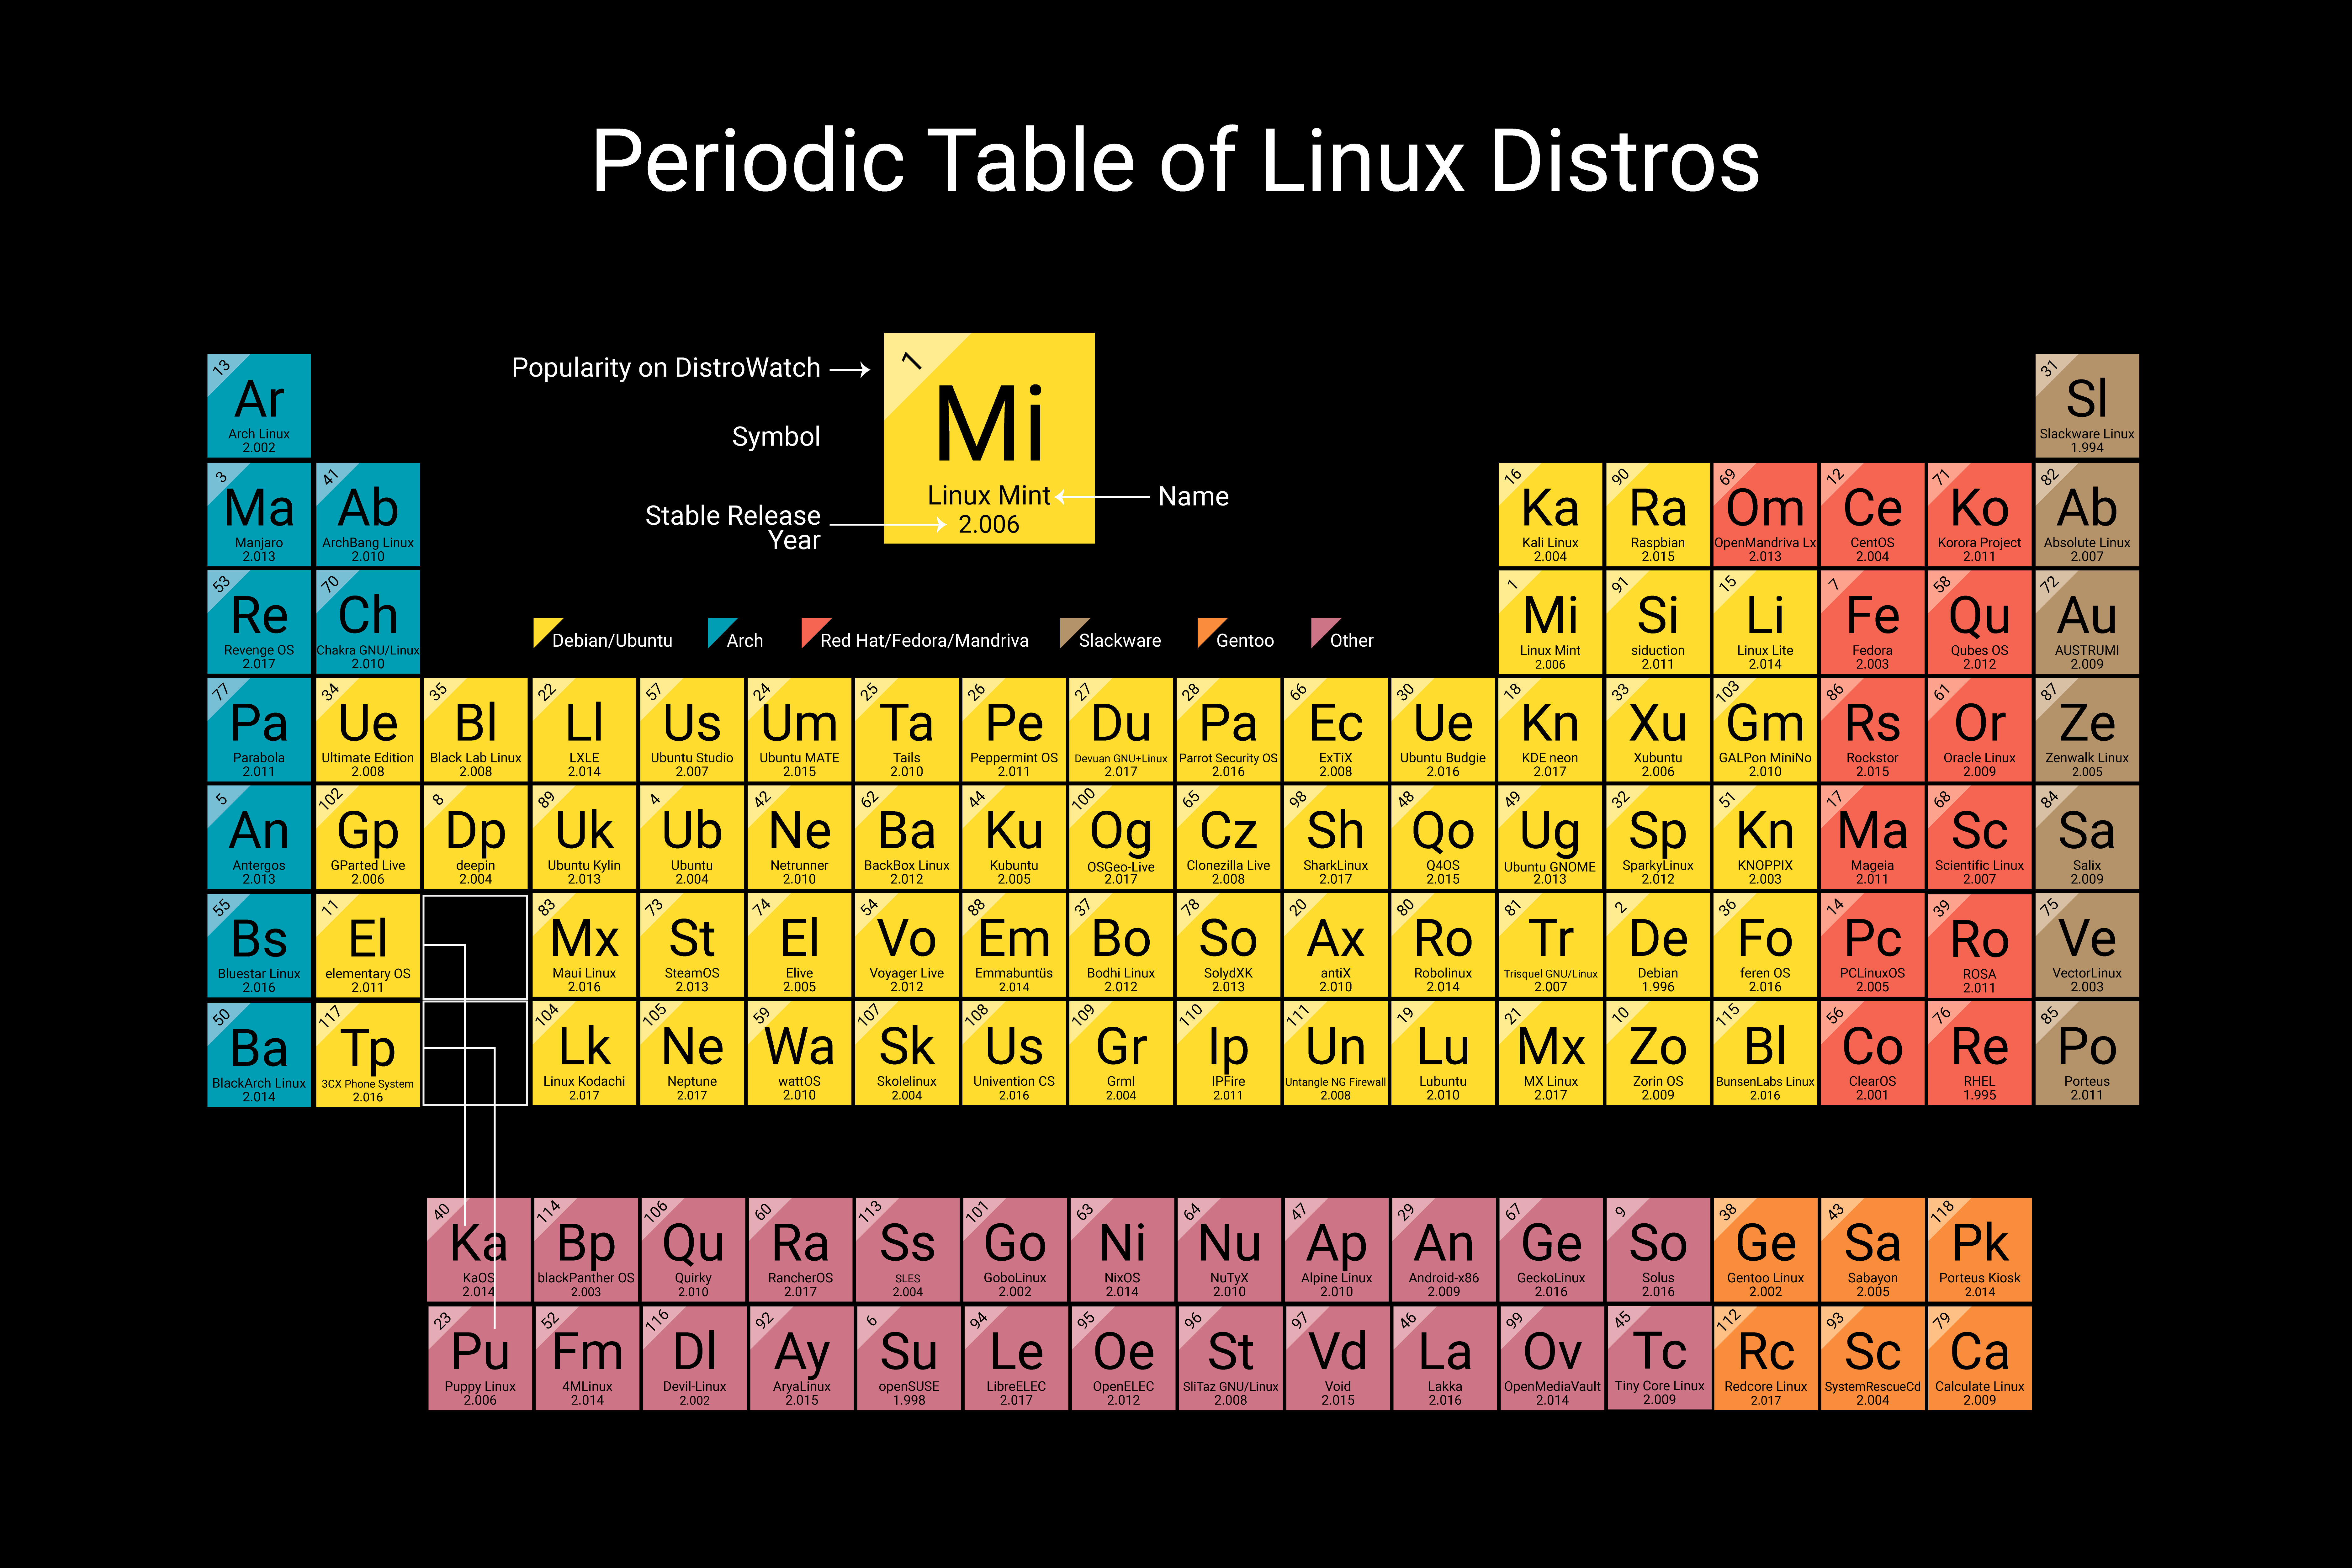
This repository of knowledge is divided by the families that distributions (hereinafter referred to by the short form of distros) tend to fall into in this modern age.
The primary three families are Debian (and its derivatives), RedHat (and its derivatives), and SUSE (and its derivatives). These will be referenced in debian-and-derivatives, redhat-and-derivatives, and suse-and-derivatives
Smaller families are grouped together under the umbrella of other-distributions. These include Arch, Gentoo, and Slackware (and, of course, their derivatives).
How to best use this trove of documents?
This entire repository of knowledge is written in Markdown to make a legible, easy-to-read storehouse of information. While they can be read in any text editor, I personally recommend Marktext for viewing them as the formatting included within these documents will make them difficult to read in a standard text editor. Installation instructions are available through the link as well as in the installing_apps.md file within each distro family subsection of this repository.
Making a request for new data
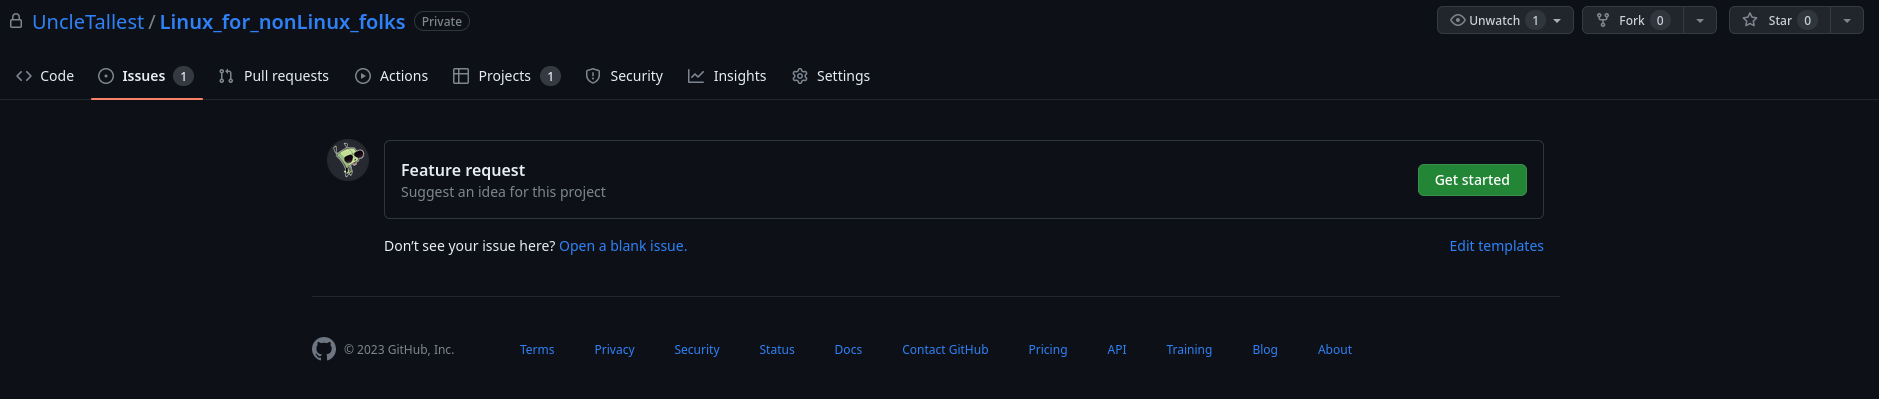
If you find yourself with an issue not yet covered in the currently existing set of documents, feel free to make a ‘feature request’ on the repository here. Just hit the Get Started button show below and follow the instructions.
Use the sidebar to navigate the full table of contents.
Let's Talk About Distros
How long has Linux been around?
Linux began in 1991 as a personal project by Finnish student Linus Torvalds “to create a new free operating system kernel”. The resulting Linux kernel has been marked by constant growth throughout its history.
What’s a distro (distribution)?
There are three main “families” of Linux distributions:
Debian, Red Hat, and SUSE
Most other Linux distributions use one of these three distributions as their foundation.
Let’s take a look at each of these families.
Debian
Debian, which dates all the way back to 1993, is one of the oldest Linux distributions still being developed today. Presently, the most popular Debian-based system is Ubuntu.
Ubuntu, distributed by the UK-based company Canonical, is one of the most popular Linux distributions available today. It is free to download, install and use. Ubuntu is packaged in three different editions - Server, Desktop, and Core.
The default desktop environment, as of 2019, is Gnome 3. In recent years Ubuntu also supported the Canonical-developed Unity desktop environment as well. The default front-end package manager for Debian distributions is APT.
Because it is generally understood as a very simple operating system to install, many first-time Linux users start by using Ubuntu. Some popular Windows applications, such as the Firefox web browser and Thunderbird email client, can be run on Ubuntu. Ubuntu offers new releases every six months, with major long-term support (LTS) releases available every two years.
Red Hat
Red Hat’s Linux offerings come in three different main forms.
- Red Hat Enterprise Linux (RHEL) is the flagship operating system, and is used on servers everywhere. CentOS is the free version of Red Hat Enterprise Linux.
- CentOS offers the same packaging as RHEL, but it doesn’t come with the same support that Red Hat Enterprise Linux offers. All support for the CentOS distribution is community-driven via technical forums.
- Fedora is sponsored by Red Hat, and offers newer, bleeding edge features that are not yet available in RHEL.
Red Hat Enterprise Linux was first released in 2002. It is developed and licensed by Red Hat. Unlike Ubuntu’s server operating system, it is not free. One license of the Red Hat Enterprise Linux Server with “self-support” costs $349 (prices increase for additional levels of support and add-ons). Many businesses find that the level of support offered by Red Hat makes the cost of the operating system worth the investment.
Administrators who want the RHEL operating system but don’t want to pay for it can use CentOS instead. CentOS was originally released in 2004, and Red Hat officially took it over in 2014. Red Hat doesn’t offer any official support for the CentOS distribution, but there is a large community of users on the internet that continue to share information and support each other.
Fedora is another distribution supported by Red Hat. Like CentOS, Fedora is also free to install and use. Fedora will generally offer features before they become available in the RHEL operating system. Like Ubuntu, Fedora offers both Workstation and Server editions.
All three of the main Red Hat distributions have a few things in common. The Red Hat Enterprise Linux, CentOS, and Fedora operating systems use YUM as the default front-end package manager. All three distributions also feature Gnome as the default desktop environment.
SUSE
SUSE Linux, while not as popular as Debian-based Ubuntu or any of the Red Hat distributions, is still considered to be one of the mainstream Linux distributions. SUSE was originally founded as a Unix-type system in Germany in 1992. Since then, it has changed hands a number of times, and is now owned by EQT, a Swedish private equity group.
There are two distributions that fall under the SUSE family - SUSE Enterprise Linux and the more popular OpenSUSE.
OpenSUSE is the freely offered edition, and still features the latest updates. SUSE Enterprise Linux, the commercially priced edition, offers features that OpenSUSE does not, such as a high availability edition and support services.
OpenSUSE has two editions - Tumbleweed and Leap.
Leap offers stable releases about every six months, while Tumbleweed is continuously updated. OpenSUSE traditionally featured KDE as its default desktop environment, but now allows users to select either the Gnome or KDE environment upon installation. T The default front-end package manager for all OpenSUSE editions is YaST.
Smaller-Scale Distributions
While Debian-based Ubuntu, SUSE, and the Red Hat distributions take up most of the Linux market share today, there are a few additional smaller distributions worth mentioning as well, including Arch Linux, Slackware, and Gentoo:
- Arch Linux is a simple, bare-bones distribution. Users that want to add packages will have to do so following the installation of the operating system, as there are not many packages included on initial install. Arch Linux users see this bare-bones installation as a feature, not a bug. There is no default desktop environment, and due to Arch Linux’ embracing of rolling releases, there are no major editions.
- Gentoo Linux is a highly customizable Linux distribution. Unlike many other Linux distributions, all source code is compiled locally on the user’s computer. Gentoo’s most famous family member is Google’s ChromeOS, the operating system that every Chromebook is built upon.
- Slackware is one of the older versions of Linux, dating back to 1993. Because of its age, many other Linux systems have been based off of this system. Slackware offers no default desktop environment, making it difficult to use for first-time users and is mostly popular with long-time Linux administrators.
Conclusion
Linux isn’t just one operating system. It’s a large family tree of different operating systems, or distributions. When deciding on the best distribution for you, it’s important to understand what options are available, and what sets each distribution apart.
Be sure that you have a good idea which package managers meet your needs, and which desktop environments you prefer. Have an understanding, too, of what type of support you’ll need for your system, and of your system’s purpose. Finally, be honest with yourself about your level of Linux expertise. Some distributions are easier to use than others.
Once you have an understanding of all of the above, you will be able to narrow down your distribution choices, and pick out the system that will be the best fit for you.
My Personal App Preferences
Under Construction
nothing to see here just yet
Setting Up My Personal System
Mount other drives
Mount non-root drives without formatting them so we keep our data intact:
/dev/nvme1n1p1 on /home/tallest/Games
/dev/sdc1 on /home/tallest/Storage
Import existing ZFS pool
sudo apt install zfsutils-linux
sudo zpool status # should be empty
sudo zpool create -f -m /home/tallest/Games/the-massive the-massive /dev/sda /dev/sdb
sudo zpool status # should show the pool status
nvidia-drivers-525+ fails to compile modules
If you see the error below while installing nvidia-driver-525 or newer, do the steps below the error message:
dpkg: error processing package nvidia-dkms-525(--configure):
 installed nvidia-dkms-525 package post-installation script subprocess returned error exit status 10

Examining the /var/lib/dkms/nvidia/525.78.01/build/make.log reveals multiple
cc: error: unrecognized command-line option ‘-ftrivial-auto-var-init=zero’
That -ftrivial-auto-var-init=zero option is only present in gcc-12 so let’s fix that.
sudo apt-get purge *nvidia* && sudo apt-get autoremove
sudo apt-get install gcc-12
sudo update-alternatives --install /usr/bin/gcc gcc /usr/bin/gcc-12 12
sudo apt-get install nvidia-driver-525 # or whichever version you want
Desktop Setup Steps
First, we need to install a better apt replacement called nala
sudo apt install nala
# or
curl https://gitlab.com/volian/volian-archive/-/raw/main/install-nala.sh | bash
Activate the beta flathub repo
flatpak remote-add --if-not-exists flathub-beta https://flathub.org/beta-repo/flathub-beta.flatpakrepo
Get Flatseal for changing flatpak permissions
flatpak install flathub com.github.tchx84.Flatseal
Zen Browser
flatpak install flathub io.github.zen_browser.zen
Betterbird
flatpak install flathub eu.betterbird.Betterbird
Cameractrls
flatpak install flathub hu.irl.cameractrls
Discord Canary (bleeding edge)
flatpak install flathub-beta com.discordapp.DiscordCanary
Discord
flatpak install flathub com.discordapp.Discord
Telegram
flatpak install flathub org.telegram.desktop
OBS Studio
flatpak install flathub com.obsproject.Studio
ProtonUp-Qt
flatpak install flathub net.davidotek.pupgui2
Bottles
flatpak install flathub com.usebottles.bottles
ProtonTricks
flatpak install flathub com.github.Matoking.protontricks
Lutris
flatpak install flathub net.lutris.Lutris
GeForce NOW (electron)
flatpak install flathub io.github.hmlendea.geforcenow-electron
Steam Link
flatpak install flathub com.valvesoftware.SteamLink
Steam
flatpak install flathub com.valvesoftware.Steam
Xenia Manager
AppImagePool (App Image manager)
flatpak install flathub io.github.prateekmedia.appimagepool
Gear Lever (App Image manager)
flatpak install flathub it.mijorus.gearlever
PCSX2
Overview
Debian and Derivatives
- Understanding Package Management
- Installing Common Desktop Applications
- Getting Graphics Drivers Sorted Out
- Gaming on Linux
- Basic Developer Setup
- Controlling Multiple PCs Easily
- There’s a New Method for Adding GPG Signing Keys
- Tweaks for Video Editing
Package Management
Table of Contents
Introduction
In this modern era, many things have changed when it comes to application packaging in Linux. On the Debian/Ubuntu side we’ve seen dpkg grow into gdebi and then be “replaced” by apt-get (later shortened to apt). They’re all still around at some level, but modern apps like to use “sandboxing” and therefore use package schemas like snap or flatpak. Elementary OS 7 (Horus) went a step further by making nearly all of it’s base apps into flatpaks. As an old neckbeard I prefer the old ways a bit more and therefore my order of preference for these will always be Apt>DEB>AppImage>Flatpak>Snap. My own security conscious brain and the trust/distrust earned by these methods dictates this order.
back to top
Apt (formerly known as apt-get)
In the Debian/Ubuntu family, apt is currently the package manager that comes installed with your distribution. It is a descendent of dpkg; which is still available, and useful to boot when apt just doesn’t have the toolset to do the job.
Apt can install standard .deb packages, snaps, and packages from either the standard repositories or third-party PPAs.
back to top
Enabling the ability to install from .deb files
sudo apt install gdebi-core gdebi
Now you can either open a .deb file with the gdebi GUI from the right-click menu in your file browser, or use sudo gdebi <filename.deb> in a terminal window.
back to top
Enabling the ability to install from PPA repositories
To install install files from a PPA repository, we need to ensure a few additional apt tools are installed.
sudo apt install software-properties-common
Once this is done, you need to add the PPA repository to your available sources. For this example I will use the Pantheon-Tweaks PPA as it is useful for my current Elementary OS 7 desktop.
sudo add-apt-repository -y ppa:philip.scott/pantheon-tweaks
***NOTE: *If this command fails, disable ipv6 on your network connection.
Then we can update our sources and install.
sudo apt update
sudo apt install -y pantheon-tweaks
Enabling the ability to install from AppImage files
First, make sure AppImageLauncher Settings isn’t already in your Applications menu; if it isyou already can use AppImage files as intended.
sudo add-apt-repository ppa:appimagelauncher-team/stable
sudo apt update
sudo apt install appimagelauncher
Now continue on to download and install the AppImage file as you have been instructed.
back to top
### Tweaks and Fixes
Issue -
Issue - What does this apt error message (“Download is performed unsandboxed as root…”) mean?
W: Download is performed unsandboxed as root as file '/var/cache/apt/archives/partial/samba-libs_2%3a4.5.8+dfsg-0ubuntu0.17.04.1_i386.deb' couldn't be accessed by user '_apt'. - pkgAcquire::Run (13: Permission denied)
The fix
sudo chown -Rv _apt:root /var/cache/apt/archives/partial/
sudo chmod -Rv 700 /var/cache/apt/archives/partial/
back to top
Installing Desktop Apps
Table of Contents
Introduction
In this modern era, many things have changed when it comes to application packaging in Linux. On the Debian/Ubuntu side, we’ve seen dpkg grow into gdebi and then be “replaced” by apt-get (later shortened to apt). They’re all still around at some level, but modern apps like to use “sandboxing” and therefore use package schemas like snap or flatpak. Elementary OS 7 (Horus) went a step further by making nearly all of its base apps into flatpaks. As an old neckbeard I prefer the old ways a bit more and therefore my order of preference for these will always be Apt>DEB>AppImage>Flatpak>Snap. My own security-conscious brain and the trust/distrust earned by these methods dictate this order. See Package Management for more information about apt.
back to top
Install Firefox
First, remove the snap version if it is installed and add the Mozilla PPA so you can get the real Firefox package.
sudo snap remove firefox
sudo add-apt-repository ppa:mozillateam/ppa
Next, alter the Firefox package priority to ensure the PPA/deb/apt version of Firefox is preferred.
echo '
Package: firefox*
Pin: release o=LP-PPA-mozillateam
Pin-Priority: 501
' | sudo tee /etc/apt/preferences.d/mozillateamppa
Now update your sources and install Firefox normally.
sudo apt-get update
sudo apt install firefox
back to top
Install LibreWolf
LibreWolf is a custom version of Firefox, focused on privacy, security, and freedom. LibreWolf
sudo apt update && sudo apt install -y wget gnupg lsb-release apt-transport-https ca-certificates

distro=$(if echo " una bookworm vanessa focal jammy bullseye vera uma " | grep -q " $(lsb_release -sc) "; then lsb_release -sc; else echo focal; fi)

wget -O- https://deb.librewolf.net/keyring.gpg | sudo gpg --dearmor -o /usr/share/keyrings/librewolf.gpg

sudo tee /etc/apt/sources.list.d/librewolf.sources << EOF > /dev/null
Types: deb
URIs: https://deb.librewolf.net
Suites: $distro
Components: main
Architectures: amd64
Signed-By: /usr/share/keyrings/librewolf.gpg
EOF

sudo apt update

sudo apt install librewolf -y
back to top
Install Vivaldi
cd ~/Downloads
wget -c https://downloads.vivaldi.com/stable/vivaldi-stable_5.7.2921.68-1_amd64.deb
sudo gdebi vivaldi-stable_5.7.2921.68-1_amd64.deb
back to top
Install Slack
Download the latest Slack 64-bit .deb from https://slack.com/downloads/linux
Open the file with sudo gdebi <appname> to install.
back to top
Install Discord
Download the latest Discord 64-bit .deb from https://discord.com/api/download?platform=linux&format=deb
Open the file with sudo gdebi <appname> to install.
back to top
Install Todoist
Todoist is currently only available as an AppImage.
cd ~/Downloads
wget -c https://electron-dl.todoist.com/linux/Todoist-1.0.0.AppImage
In your file manager right-click on the Todoist AppImage file and choose the Open with AppImageLauncher option – in the modal dialog that pops up choose the Integrate and Run option to install and then launch Todoist.
back to top
Install MarkText editor
cd /Downloads
wget -c https://github.com/marktext/marktext/releases/download/v0.17.1/marktext-amd64.deb
sudo gdebi marktext-amd64.deb
back to top
Install Strawberry Music Player
sudo add-apt-repository ppa:jonaski/strawberry
sudo apt update
sudo apt install strawberry
back to top
Install Nicotine
Nicotine+ is a SoulSeek client for linux.
There is a .deb package available here but for a proper install that can update if a new client comes out this is the way.
sudo apt install software-properties-common
sudo add-apt-repository ppa:nicotine-team/stable
sudo apt-key adv --keyserver keyserver.ubuntu.com --recv-keys 6CEB6050A30E5769
sudo apt update
sudo apt install nicotine
back to top
Install Zoom
cd ~/Downloads
wget -c https://zoom.us/client/5.14.2.2046/zoom_amd64.deb
sudo gdebi zoom_amd64.deb
back to top
Install VLC
sudo apt install vlc
# add libdvdcss support
sudo apt install libdvd-pkg
sudo dpkg-reconfigure libdvd-pkg
back to top
Getting Graphics Drivers Sorted
How to Setup Elementary OS For Gaming - Steam Proton, Wine, Lutris, AMD & Nvidia GPU Drivers
Step 1 – Enable PPAs
Open a Terminal window and type the following:
sudo apt install software-properties-common
Step 2 – Download and Install Latest GPU Drivers
Nvidia Hardware
Open a Terminal window and run the following commands in sequence:
sudo add-apt-repository ppa:graphics-drivers/ppa
sudo dpkg --add-architecture i386
sudo apt update
sudo apt install nvidia-driver-455
sudo apt install libvulkan1 libvulkan1:i386
IMPORTANT: DO NOT reboot the computer until you verify that the proper kernel headers were installed to properly build the nvidia kernel modules.
Verifying kernel headers are installed to build modules
IMPORTANT: As of 25Apr2023, upgrading to a new kernel under Ubuntu 22.04 does not succeed at rebuilding dkms modules during the upgrade because apt sees the linux-headers are an ‘optional’ install target. So if you upgrade your kernel, check the name of the kernel just installed and make sure to install the matching kernel headers; installing the headers for the new kernel will automatically successfully rebuild the dkms modules for the new kernel as part of the process of installing the correct linux-header package.
dpkg --list | grep linux-image-
rc  linux-image-5.15.0-58-generic              5.15.0-58.64                                     amd64        Signed kernel image generic
ii  linux-image-5.19.0-38-generic              5.19.0-38.39~22.04.1                             amd64        Signed kernel image generic
ii  linux-image-5.19.0-40-generic              5.19.0-40.41~22.04.1                             amd64        Signed kernel image generic
ii  linux-image-5.19.0-41-generic              5.19.0-41.42~22.04.1                             amd64        Signed kernel image generic
ii  linux-image-generic-hwe-22.04              5.19.0.41.42~22.04.14                            amd64        Generic Linux kernel image
As you can see above, the kernel I just installed (at the time of writing this) is
linux-image-5.19.0-41-generic
so I would type
sudo apt install linux-headers-5.19.0-41-generic
now you may reboot to use the new kernel AND new nvidia drivers.
AMD / Intel Hardware
Open a Terminal window and run the following commands in sequence:
sudo add-apt-repository ppa:kisak/kisak-mesa
sudo dpkg --add-architecture i386
sudo apt update && sudo apt upgrade
sudo apt install libgl1-mesa-dri:i386
sudo apt install mesa-vulkan-drivers mesa-vulkan-drivers:i386
Reboot to apply the settings.
Gaming on Linux
Step 1 – Install Steam, Enable Proton and Install Proton-GE
Install Steam using the Terminal with the following command:
sudo apt install gdebi-core gdebi
cd ~/Downloads
wget -c https://cdn.akamai.steamstatic.com/client/installer/steam.deb
gdebi-core steam.deb
Once installed, sign into your account.
Enable Proton for all your game library by navigating to Steam>Settings>Steam Play>Advanced and ticking the Enable Steam Play for all other titles, once done restart Steam to apply.
https://github.com/GloriousEggroll/proton-ge-custom
Download Proton-GE by navigating to the releases section of the GitHub page, scroll down to the assets section, and download the tar.gz archive.
Once downloaded, extract the Proton-GE folder, and copy it.
Next navigate to your Home directory, enable Hidden Files, navigate to .steam root and create a new folder called compatibilitytools.d and paste the extracted Proton-GE folder inside.
Restart Steam if already open, and when you now right click on a game’s properties, under the General tab, tick the Force the use of a specific Steam Play compatibility tool, you will now be able to select the Proton-GE build from the list.
Step 2 – Install Lutris
Open a Terminal and type the following commands in sequence:
sudo add-apt-repository ppa:lutris-team/lutris
sudo apt update
sudo apt install lutris
Getting PlayFab cross play working under Linux
PlayFab is a mechanism to allow crossplay games to work on Linux; Valheim for sure uses this.
Not all of the required libraries are included for using the PlayFab cross play system under modern debian-based distros. Fix this with:
apt-get update && apt-get install -y libpulse-dev libatomic1 libc6
Basic Developer Workstation Setup
Project 0
Install VS Code
Running Visual Studio Code on Linux
Project 8
Install Node using NVM
Another way of installing Node.js that is particularly flexible is to use nvm, the Node Version Manager. This piece of software allows you to install and maintain many different independent versions of Node.js, and their associated Node packages, at the same time.
To install NVM on your Ubuntu 22.04 machine, visit the project’s GitHub page. Copy the curl command from the README file that displays on the main page. This will get you the most recent version of the installation script.
Before piping the command through to bash, it is always a good idea to audit the script to make sure it isn’t doing anything you don’t agree with. You can do that by removing the | bash segment at the end of the curl command:
`curl -o- https://raw.githubusercontent.com/nvm-sh/nvm/v0.39.1/install.sh`
Take a look and make sure you are comfortable with the changes it is making. When you are satisfied, run the command again with | bash appended at the end. The URL you use will change depending on the latest version of nvm, but as of right now, the script can be downloaded and executed by typing:
`curl -o- https://raw.githubusercontent.com/nvm-sh/nvm/v0.39.1/install.sh | bash`
This will install the nvm script to your user account. To use it, you must first source your .bashrc file:
`source ~/.bashrc`
Now, you can ask NVM which versions of Node are available:
`nvm list-remote`
Output
       v16.11.1
       v16.12.0
       v16.13.0   (LTS: Gallium)
       v16.13.1   (LTS: Gallium)
       v16.13.2   (LTS: Gallium)
       v16.14.0   (Latest LTS: Gallium)
        v17.0.0
        v17.0.1
        v17.1.0
        v17.2.0
        v17.3.0
        v17.3.1
        v17.4.0
        v17.5.0
        v17.6.0
It’s a very long list! You can install a version of Node by typing any of the release versions you see. For instance, to get version v16.14.0 (another LTS release), you can type:
`nvm install v16.14.0`
You can see the different versions you have installed by typing:
`nvm list`
Output
->     v16.14.0
default -> v16.14.0
iojs -> N/A (default)
unstable -> N/A (default)
node -> stable (-> v16.14.0) (default)
stable -> 16.14 (-> v16.14.0) (default)
lts/* -> lts/gallium (-> v16.14.0)
lts/argon -> v4.9.1 (-> N/A)
lts/boron -> v6.17.1 (-> N/A)
lts/carbon -> v8.17.0 (-> N/A)
lts/dubnium -> v10.24.1 (-> N/A)
lts/erbium -> v12.22.10 (-> N/A)
lts/fermium -> v14.19.0 (-> N/A)
lts/gallium -> v16.14.0
This shows the currently active version on the first line (-> v16.14.0), followed by some named aliases and the versions that those aliases point to.
Note: if you also have a version of Node.js installed through apt, you may see a system entry here. You can always activate the system-installed version of Node using nvm use system.
You can install a release based on these aliases as well. For instance, to install fermium, run the following:
`nvm install lts/fermium`
Output
Downloading and installing node v14.19.0...
Downloading https://nodejs.org/dist/v14.19.0/node-v14.19.0-linux-x64.tar.xz...
################################################################################# 100.0%
Computing checksum with sha256sum
Checksums matched!
Now using node v14.19.0 (npm v6.14.16)
You can verify that the install was successful using the same technique from the other sections, by typing:
`node -v`
Output
v14.19.0
The correct version of Node is installed on our machine as we expected. A compatible version of npm is also available.
Project 12
Install Postman VS Code extension
There is no standard way to install Postman across all distribution so I prefer the VS Code extension that allows you to run Postman from inside VS Code. Just install the Postman VS Code extension and sign-in in the sidebar.
Install MongoDB
wget -qO - https://www.mongodb.org/static/pgp/server-6.0.asc |  gpg --dearmor | sudo tee /usr/share/keyrings/mongodb.gpg > /dev/null
echo "deb [ arch=amd64,arm64 signed-by=/usr/share/keyrings/mongodb.gpg ] https://repo.mongodb.org/apt/ubuntu jammy/mongodb-org/6.0 multiverse" | sudo tee /etc/apt/sources.list.d/mongodb-org-6.0.list
sudo apt update
sudo apt install mongodb-org
Running MongoDB
Start MongoDB
You can start the mongod process by issuing the following command:
sudo systemctl start mongod
If you receive an error similar to the following when starting mongod:
Failed to start mongod.service: Unit mongod.service not found.
Run the following command first:
sudo systemctl daemon-reload
Then run the start command above again.
Verify that MongoDB has started successfully
sudo systemctl status mongod
You can optionally ensure that MongoDB will start following a system reboot by issuing the following command:
sudo systemctl enable mongod
Stop MongoDB
As needed, you can stop the mongod process by issuing the following command:
sudo systemctl stop mongod
Restart MongoDB
You can restart the mongod process by issuing the following command:
sudo systemctl restart mongod
You can follow the state of the process for errors or important messages by watching the output in the /var/log/mongodb/mongod.log file.
Install MongoDB Compass
Download MongoDB Compass
wget https://downloads.mongodb.com/compass/mongodb-compass_1.43.0_amd64.deb
Install MongoDB Compass
sudo dpkg -i mongodb-compass_1.43.0_amd64.deb
Start MongoDB Compass
mongodb-compass
Controlling multiple PCs Easily
What is a software KVM?
How is a software KVM different from VNC/noMachine/RDP?
What are my options for software KVM?
Paid vs Free
Compatability matters
Which one do I recommend?
Barrier is the only completely cross-platform, FOSS (Free and Open Source Software) solution and has been for quite some time. Barrier was originally a fork of v1.9 of Synergy’s open source repository; this was due to Symless abandoning all support for their Synergy v1 software and making Synergy v2 require payments to function at all.
Barrier
From the README.md on the Barrier repo:
Barrier is software that mimics the functionality of a KVM switch, which historically would allow you to use a single keyboard and mouse to control multiple computers by physically turning a dial on the box to switch the machine you’re controlling at any given moment. Barrier does this in software, allowing you to tell it which machine to control by moving your mouse to the edge of the screen, or by using a keypress to switch focus to a different system.
Barrier was forked from Symless’s Synergy 1.9 codebase. Synergy was a commercialized reimplementation of the original CosmoSynergy written by Chris Schoeneman.
Let’s Install it
On Windows:
Download the Barrier .exe file from here
Install as you normally would.
On MacOS:
Download the Barrier .dmg file from here
Install by opening the DMG and dragging the icon to your applications folder in Finder.
On Linux:
Barrier is easily installable from a terminal:
Ubuntu family of distros
sudo apt install barrier
RedHat family of distros
sudo dnf install barrier
Suse family of distros
sudo zypper install barrier
Find Barrier in your application menu and run it that first time.
Lets configure Barrier:
For the Server:
this is the one with the keyboard and mouse you want to use
Configure as shown:
fig. 1 - configuration (main window)

fig. 2 - settings (Barrier menu)

For the Clients:
these are the PCs you want to control
Configure as shown:
fig. 1 - configuration (main window)

fig. 2 - settings (Barrier menu)

Correct way to add new signing keys in 2023
TL;DR How-to
Installing a package from an external repository in Ubuntu consists of three steps:
- Adding the repository’s GPG key to the system
- Adding the external repository to the system
- Installing the package from this external repository
But lately, you would notice a message about ‘apt-key being deprecated’ when you try installing packages from third-party repositories.
Take the installation of Spotify on Ubuntu for example. When I add the GPG key to the system, it complains.
curl -sS https://download.spotify.com/debian/pubkey_5E3C45D7B312C643.gpg | sudo apt-key add -
[sudo] password for abhishek:
Warning: apt-key is deprecated. Manage keyring files in trusted.gpg.d instead (see apt-key(8)).
OK
It’s a warning, not an error. It doesn’t stop the process. The GPG key is added to your system and you can continue adding the external repository.
However, it will create further warnings (again, not errors). In the example here, if I continue adding the external repository, it shows me this message “key is stored in legacy trusted.gpg keyring“.
Reading package lists... Done
Building dependency tree... Done
Reading state information... Done
All packages are up to date.
W: http://repository.spotify.com/dists/stable/InRelease: Key is stored in legacy trusted.gpg keyring (/etc/apt/trusted.gpg), see the DEPRECATION section in apt-key(8) for details.
It doesn’t stop the installation of the package, though. In the example, I was able to install the spotify-client package afterward.
If it’s not an error, do you need to be worried about it? Probably not. Not now, at least. However, it would be better to understand future changes coming to this external repo mechanism.
Understanding the apt-key deprecation and trusted.gpg issue
There are two parts to this message:
- apt-key is deprecated
- Manage keyring files in trusted.gpg.d
I’ll come to both points in a moment.
When you add the keys (.gpg or .asc) of a repository, your system trusts the packages (signed with that key) coming from the repository. If you don’t add the key of a repository, your system won’t allow installing packages from it.
For a long time, the apt-key command line tool has been used for managing the repository keys to Debian and other distros using apt package management. You can add, list, update, and remove the keys with this command.
Problem with the way apt-key works
It works by adding the keys to the /etc/apt/trusted.gpg file. The apt package manager trusts the keys inside this file.
Sounds good, right? However, it was discovered to be a potential security issue. Your system trusts those keys completely, not just for the packages you added them for.
Imagine that you added keys to repository A to get package AA and to repo B to get package BB. Your system will gladly accept package BB signed by the key of repo A. It cannot relate the keys to their respective packages.
Now, it’s easier said than done because there are other factors in play like apt policy and preferences but it opens an attack surface.
This is the reason why apt-key is being deprecated. That’s the first part of the warning message.
Ubuntu wants you to separate GPG keys
Coming to the second part of the warning message; “Manage keyring files in trusted.gpg.d”.
Ubuntu doesn’t want you to add all the signature keys in the single /etc/apt/trusted.gpg file. It suggests using a separate file that are located in the /etc/apt/trusted.gpg.d directory.
It’s the same mechanism it uses for the sources list where external repository sources are listed in their own file under /etc/apt/sources.list.d instead of keeping everything under the /etc/apt/sources.list file. It makes managing the external repos a bit easier.
This means that instead of using the apt-key in this fashion:
curl -sS https://download.spotify.com/debian/pubkey_5E3C45D7B312C643.gpg | sudo apt-key add -
You should use it like this:
curl -sS https://download.spotify.com/debian/pubkey_5E3C45D7B312C643.gpg | gpg --dearmor | sudo tee /etc/apt/trusted.gpg.d/spotify.gpg
Which is basically adding the key to its dedicated file under /etc/apt/trusted.d directory. Ubuntu won’t complain anymore.
Although this doesn’t fix the original concern of cross-signing the packages. The proper way to fix is to add the key location to the sources list file of the repository. I’ll discuss both methods in the next section.
How to add a new repo with signing key
Add the key
As an example, let’s add the key of the Spotify repository in /usr/share/keyrings directory.
curl -sS https://download.spotify.com/debian/pubkey_5E3C45D7B312C643.gpg | gpg --dearmor | sudo tee /usr/share/keyrings/spotify.gpg
Add the apt repo
Now, comes the next part. Normally, the content of the sources list file are like this:
deb URL_of_the_repo stable non-free
You should edit it and add the location of the key file like this:
deb [signed-by=/usr/share/keyrings/key-file.gpg] URL_of_the_repo stable non-free
This way, you are linking the package to a specific key. Now, this key cannot be used to download any other package. No more cross-signing.
Using the Spotify example, I modified the command this way so that the sources list also contains the signed by information.
echo "deb [signed-by=/usr/share/keyrings/spotify.gpg] http://repository.spotify.com stable non-free" | sudo tee /etc/apt/sources.list.d/spotify.list
Video Editing Tweaks
Video Editing Tweaks
Install and setup OBS Studio
The most recent version of OBS Studio is available as a flatpak in the Elementary OS App Center or can also be installed from OBS Studio | Flathub.
Now OBS Studio settings are a mix of the arcane and obtuse and most folks don’t really understand them; with that being said OBS Studio, out of the box, will not output any video recording format that the free version of Davinci Resolve can load and use. So we’re going to fix that right now. We’re going to change the recording output settings to use Custom Output (FFmpeg) and use the following settings.
Container Format: mov
Video Bitrate: 290000Kbps
Keyframe Interval: 1
Video Encoder: dnxhd
Audio Bitrate: 2304 Kbps
Audio Encoder: pcm_s24le
You should now be able to record 1080p 60 video using DNxHD 290. This will import directly into the free version of Davinci Resolve. See Interfacing Linux: Record DNxHD With OBS – Linux Game Cast for slightly more details and an image to verify your settings.
Install and setup Davinci Resolve
The free version of Davinci Resolve is available for download at DaVinci Resolve 18 | Blackmagic Design. Once downloaded perform the following steps:
cd ~/Downloads/   # or wherever you downloaded the archive to on your system
unzip ./DaVinci_Resolve_18.5_Linux.zip
chmod +x ./DaVinci_Resolve_18.5_Linux.run
sudo ./DaVinci_Resolve_18.5_Linux.run -i
Go through the installation steps as usual. If the installation fails, the error message popup that appears will tell you if other files are needed.
For example, for my first install on my current machine the message told me I was missing xcb-cursor and xcb-damage; these are the actual library names, not the package names you need to install.
To find the package names I used apt search for each one:
$ apt search xcb-cursor
Sorting... Done
Full Text Search... Done
libxcb-cursor-dev/jammy 0.1.1-4ubuntu1 amd64
  utility libraries for X C Binding -- cursor, development files
libxcb-cursor0/jammy,now 0.1.1-4ubuntu1 amd64 [installed]
  utility libraries for X C Binding -- cursor
$ apt search xcb-damage
Sorting... Done
Full Text Search... Done
libxcb-damage0/jammy,now 1.14-3ubuntu3 amd64 [installed]
  X C Binding, damage extension
libxcb-damage0-dev/jammy 1.14-3ubuntu3 amd64
  X C Binding, damage extension, development files
We don’t need the development libraries so using the above information I would install libxcb-cursor0 and libxcb-damage0:
sudo apt install libxcb-cursor0 libxcb-damage0
Once all missing libraries are installed, rerun the Davinci installer.
sudo ./DaVinci_Resolve_18.5_Linux.run -i
Getting access to play BluRay discs in video apps
You need two files: The first is just a download and copy -> http://fvonline-db.bplaced.net/fv_download.php?lang=eng
This goes in ~/.config/aacs/.
The second step is to run sudo apt install libaacs.
If your Bluray is only using AACS encryption these first two steps will get them playing on Linux.
If no then you need to download and compile libbdplus and also make sure that a full JRE (Jave Runtime Environment) is installed. See ()[https://www.videolan.org/developers/libbdplus.html] and ()[]
Overview
Red Hat and Derivatives
Fedora is the flagship of the Red Hat family for desktop users — cutting-edge, community-driven, and the proving ground for what eventually lands in Red Hat Enterprise Linux. If you want a polished Linux desktop that stays current without going full rolling-release, Fedora is an excellent choice.
In This Section
- Initial Fedora Workstation Setup — first steps after installation, hardware setup, applications, and more
- Package Management — DNF5, RPM Fusion, Flatpak, and Snap
A Note on the Red Hat Family
| Distro | Who It’s For |
|---|---|
| Fedora | Desktop users, developers, people who want current software |
| RHEL (Red Hat Enterprise Linux) | Businesses — stable, supported, paid |
| CentOS Stream | Developers tracking what will eventually be in RHEL |
| Rocky Linux / AlmaLinux | Free RHEL rebuilds — what CentOS used to be |
If a friend or family member asks you what to use, Fedora Workstation is the answer. The others are server and enterprise territory.
Initial Fedora Workstation Setup
Initial Fedora Workstation Setup
current as of Fedora 41
Table of Contents
During Install
Drive Partitioning
Fedora’s installer (Anaconda) will handle partitioning for you if you let it, and for most people that’s fine. If you want more control, here’s a layout that works well:
mountpoint | suggested size | format | notes
-----------------------------------------------------------------
/boot      |  1-2 GB        | ext4   | bootloader lives here
/boot/efi  |  512 MB-1 GB  | fat32  | required for UEFI systems
swap       | equal to RAM   | swap   | or use a swapfile instead
/          |  50+ GB        | ext4   | your root filesystem
/home      |  remainder     | ext4   | your personal files
Recommendation: put
/homeon a separate physical drive if you have one.This is the single best thing you can do for your Linux setup. When you reinstall, upgrade, or even nuke the OS by accident, your personal files, configs, and data survive completely untouched. Just tell the installer to mount your existing drive at
/homewithout formatting it. This turns a disaster into a 20-minute inconvenience.If you only have one drive, at minimum make
/homeits own partition rather than lumping it in with/.
After Install
DNF5 — Fedora’s Package Manager
Fedora 41 ships with DNF5 as the default package manager — a complete rewrite of
the older DNF that’s significantly faster. The commands you’d find in older guides still
work (backward compatibility is maintained), so don’t panic if something says dnf install
instead of dnf5 install — they’re the same.
Quick reference:
sudo dnf install <package>   # install a package
sudo dnf remove <package>    # remove a package
sudo dnf update              # update all packages
sudo dnf search <term>       # search available packages
sudo dnf info <package>      # show details about a package
sudo dnf list installed      # list installed packages
First thing to do after install — update everything:
sudo dnf upgrade --refresh
sudo dnf update -y
Tune DNF5 for faster downloads:
echo 'max_parallel_downloads=10' | sudo tee -a /etc/dnf/dnf.conf
echo 'fastestmirror=1' | sudo tee -a /etc/dnf/dnf.conf
cat /etc/dnf/dnf.conf  # verify your changes
Set your hostname (replace your-hostname with whatever you want to call your machine):
hostnamectl set-hostname your-hostname
Additional Repositories
Out of the box, Fedora only includes fully open-source packages. For proprietary software, drivers, and media codecs, you’ll want RPM Fusion — the community-maintained repo that fills the gaps.
# Install both the free (open-source) and nonfree (proprietary) repos
sudo dnf install -y \
  https://download1.rpmfusion.org/free/fedora/rpmfusion-free-release-$(rpm -E %fedora).noarch.rpm \
  https://download1.rpmfusion.org/nonfree/fedora/rpmfusion-nonfree-release-$(rpm -E %fedora).noarch.rpm

# Enable testing repos to get the freshest updates
sudo dnf config-manager --set-enabled rpmfusion-free-updates-testing
sudo dnf config-manager --set-enabled rpmfusion-nonfree-updates-testing

# Update and pull in the core multimedia group
sudo dnf upgrade --refresh
sudo dnf groupupdate core
sudo dnf install -y rpmfusion-free-release-tainted
sudo dnf install -y dnf-plugins-core
To see what package groups are available (there are good ones):
sudo dnf grouplist -v
Nvidia Drivers
Fedora 41 supports Nvidia driver installation directly through RPM Fusion, and it now works with UEFI Secure Boot enabled. No more fighting with COPR workarounds.
# Make sure your system is fully updated first — this matters
sudo dnf upgrade --refresh

# Install the akmod (kernel module) driver from RPM Fusion nonfree
sudo dnf install akmod-nvidia

# For CUDA support (machine learning, GPU computing, video encoding)
sudo dnf install xorg-x11-drv-nvidia-cuda

# Reboot to load the new kernel module
sudo reboot
Note: After rebooting, give the system a minute or two before expecting accelerated graphics — the
akmodprocess compiles the kernel module on first boot. If you reboot immediately after the install completes and things look wrong, wait 2-3 minutes and reboot again.
For AMD GPUs, the open-source driver is included in the kernel — no extra steps needed.
Desktop Environments
Fedora Workstation ships with GNOME, but you’re not stuck with it. Install any of these:
# Cinnamon — great choice if you're coming from Windows
sudo dnf groupinstall "Cinnamon Desktop"

# MATE — lightweight, traditional two-panel layout
sudo dnf groupinstall "MATE Desktop" --with-optional "MATE Applications"

# KDE Plasma — feature-rich, highly configurable
sudo dnf groupinstall "KDE Plasma Workspaces"

# Xfce — lightweight and fast
sudo dnf groupinstall "Xfce Desktop"
After installing, log out and select your new desktop from the login screen’s session menu.
Useful Package Groups
# Development tools and creative software
sudo dnf groupinstall "Development and Creative Workstation"

# Office productivity suite (includes LibreOffice)
sudo dnf groupinstall "Office/Productivity"

# 3D printing tools
sudo dnf groupinstall "3D Printing"
Important Single Packages
# Container and virtualization tools
sudo dnf install docker-compose

# Utilities that are suspiciously absent by default
sudo dnf install cabextract p7zip p7zip-plugins

# A proper terminal text editor
sudo dnf install vim-enhanced

# USB webcam utilities
sudo dnf install v4l-utils v4l2ucp
Flatpak Support
Flatpak is the recommended way to install desktop apps on Fedora — it’s sandboxed, distro- agnostic, and Flathub has almost everything.
# Add Flathub (the main Flatpak app store)
flatpak remote-add --if-not-exists flathub https://flathub.org/repo/flathub.flatpakrepo

# Add the beta channel (for cutting-edge versions of some apps)
flatpak remote-add --if-not-exists flathub-beta https://flathub.org/beta-repo/flathub-beta.flatpakrepo

# Keep Flatpak apps up to date
flatpak update
Snap Support
Snap is Canonical’s (Ubuntu’s maker) packaging format. It works on Fedora, though Flatpak is generally preferred here. Enable it if you need something that’s only available as a snap.
sudo dnf install -y snapd
sudo ln -s /var/lib/snapd/snap /snap  # enables "classic" confinement mode

# Restart — snap needs the new paths to be active
sudo reboot
After reboot:
sudo snap refresh
sudo snap install snap-store  # optional: graphical snap browser
Fonts
# Google's Roboto font family
sudo dnf install -y google-roboto*

# Microsoft core fonts (for compatibility when someone sends you a .docx)
sudo dnf install -y curl cabextract xorg-x11-font-utils fontconfig
sudo rpm -i https://downloads.sourceforge.net/project/mscorefonts2/rpms/msttcore-fonts-installer-2.6-1.noarch.rpm
SSH Keys
Generate a key pair for authenticating to servers, GitHub, etc. Ed25519 is the modern algorithm — smaller and faster than RSA.
# Generate a new key (replace the comment with something meaningful to you)
ssh-keygen -t ed25519 -C "fedora-workstation"

# Load the key into the SSH agent for this session
eval "$(ssh-agent -s)"
ssh-add ~/.ssh/id_ed25519

# Print your public key so you can paste it into GitHub, servers, etc.
cat ~/.ssh/id_ed25519.pub
Git and Version Control
# Git and Git LFS (for large file support)
sudo dnf install -y git git-lfs
git-lfs install

# Configure your identity
git config --global user.name "Your Name"
git config --global user.email "you@example.com"
Various Applications
DaVinci Resolve
DaVinci Resolve has a free version for Linux that’s genuinely excellent for video editing.
- Visit blackmagicdesign.com/products/davinciresolve
- Choose the current free Linux version from the selector
- Fill out the (required) registration form and download the
.ziparchive - Extract and run the installer:
unzip DaVinci_Resolve_*.zip
sudo chmod +x DaVinci_Resolve_*.run
sudo ./DaVinci_Resolve_*.run -i
Discord
Multiple ways to install — pick one:
# Flatpak (recommended)
flatpak install flathub com.discordapp.Discord

# RPM Fusion
sudo dnf install discord

# Snap
sudo snap install discord --edge
sudo snap connect discord:system-observe
Dropbox
sudo dnf install -y dropbox nautilus-dropbox
Sublime Text
# Add the GPG key
sudo rpm -v --import https://download.sublimetext.com/sublimehq-rpm-pub.gpg

# Add the stable repo
sudo dnf config-manager --add-repo https://download.sublimetext.com/rpm/stable/x86_64/sublime-text.repo

# Install
sudo dnf install sublime-text
Sublime Merge (Git GUI)
# Uses the same repo as Sublime Text — if you added it above, just install:
sudo dnf install sublime-merge
Vivaldi Browser
sudo dnf install -y dnf-utils
sudo dnf config-manager --add-repo https://repo.vivaldi.com/archive/vivaldi-fedora.repo
sudo dnf install -y vivaldi-stable
Zoom
# Download the current RPM from Zoom's site
wget https://zoom.us/client/latest/zoom_x86_64.rpm
sudo dnf localinstall zoom_x86_64.rpm
Multimedia
VLC
sudo dnf install -y vlc
Multimedia Codecs
For full codec support (H.264, AAC, MP3, DVD playback, etc.):
sudo dnf groupupdate sound-and-video
sudo dnf install -y libdvdcss
sudo dnf install -y gstreamer1-plugins-{bad-\*,good-\*,ugly-\*,base} gstreamer1-libav \
  --exclude=gstreamer1-plugins-bad-free-devel ffmpeg gstreamer-ffmpeg
sudo dnf install -y lame\* --exclude=lame-devel
sudo dnf group upgrade --with-optional Multimedia
For OpenH264 (browser video calls):
sudo dnf config-manager --set-enabled fedora-cisco-openh264
sudo dnf install -y gstreamer1-plugin-openh264
OBS Studio
# Flatpak version includes most popular plugins out of the box
flatpak install flathub com.obsproject.Studio
Gaming
# Steam (via RPM Fusion)
sudo dnf install steam -y

# Heroic Games Launcher (Epic and GOG)
flatpak install flathub com.heroicgameslauncher.hgl

# Lutris (multi-platform game manager)
flatpak install flathub net.lutris.Lutris

# ProtonUp-Qt (manage Proton/Wine versions for Steam and Lutris)
flatpak install flathub net.davidotek.pupgui2
Advanced: Hardware Security Key Setup
This section covers setting up a YubiKey (or compatible FIDO2/PIV hardware key) for two-factor authentication on sudo and for GPG key storage. This is beyond what most users need, but if you care about security, it’s worth the effort.
Required Packages
sudo dnf install -y yubikey-manager pam-u2f pamu2fcfg
sudo dnf install -y gpg gnupg2 gnupg-pkcs11-scd pcsc-tools opensc pcsc-lite-ccid

# Start and enable the smart card daemon
sudo systemctl start pcscd
sudo systemctl enable pcscd
Insert your key and verify it’s recognized:
ykman info
If you see No YubiKey detected, try sudo systemctl restart pcscd — this is a known
quirk and the restart almost always fixes it.
Two-Factor Authentication for sudo
sudo authselect select sssd with-pam-u2f-2fa without-nullok
mkdir ~/.config/Yubico

# Register your primary key (touch the metal contact when it flashes)
pamu2fcfg > ~/.config/Yubico/u2f_keys

# Register your backup key on the same line
pamu2fcfg -n >> ~/.config/Yubico/u2f_keys
IMPORTANT: Before closing this terminal, open a new terminal and verify that
sudo echo testworks and prompts for your physical key touch. Do not close the original terminal until you’ve confirmed this — it’s your escape hatch if something goes wrong.
GPG Key on YubiKey
If you want to store your private GPG key on the YubiKey’s smart card (so the key never touches your disk):
# Check that gpg can see the card
gpg --card-status

# If you get "No such device", restart pcscd:
sudo systemctl restart pcscd
Refer to the YubiKey-Guide for the full process of generating and transferring GPG keys to the card — it’s thorough and well- maintained.
Package Management
Using the Fedora package manager – DNF
DNF Flags
$ echo 'fastestmirror=1' | sudo tee -a /etc/dnf/dnf.conf
$ echo 'max_parallel_downloads=10' | sudo tee -a /etc/dnf/dnf.conf
$ echo 'deltarpm=true' | sudo tee -a /etc/dnf/dnf.confb
$ cat /etc/dnf/dnf.conf
After Install
$ sudo dnf upgrade --refresh
$ sudo dnf update -y
Additional Repositories
sudo dnf install -y  https://download1.rpmfusion.org/free/fedora/rpmfusion-free-release-$(rpm -E %fedora).noarch.rpm
sudo dnf install -y https://download1.rpmfusion.org/nonfree/fedora/rpmfusion-nonfree-release-$(rpm -E %fedora).noarch.rpm
sudo dnf config-manager --set-enabled rpmfusion-free-updates-testing
sudo dnf config-manager --set-enabled rpmfusion-nonfree-updates-testing

sudo dnf upgrade --refresh
sudo dnf groupupdate core
sudo dnf install -y rpmfusion-free-release-tainted
sudo dnf install -y dnf-plugins-core
Checkout sudo dnf grouplist -v to see available groups you might be interested in.
Other package managers/types
Flatpak support
Let’s make sure that both the normal and beta repos for Flatpak are working as intended.
flatpak remote-add --if-not-exists flathub https://flathub.org/repo/flathub.flatpakrepo
flatpak install flathub org.gnome.Recipes
flatpak remote-add --if-not-exists flathub-beta https://flathub.org/beta-repo/flathub-beta.flatpakrepo
flatpak install flathub-beta org.godotengine.Godot
flatpak update
Snap support
Enabling snap support boils down to running the following commands:
sudo dnf install -y snapd
sudo ln -s /var/lib/snapd/snap /snap # for classic snap support
sudo reboot now
The restart is needed to ensure snap’s paths are updated correctly. After the reboot, check whether there are any updates (and install Snap Store for ease of use):
sudo snap refresh
sudo snap install snap-store
Overview
SUSE and Derivatives
SUSE is one of the oldest Linux distributions still in active development — founded in Germany in 1992. It has a reputation for being extremely stable, enterprise-ready, and for having some of the best system administration tooling in the Linux world.
Most people will encounter SUSE in one of two flavors: OpenSUSE (free, for home and developer use) or SUSE Linux Enterprise (paid, for business servers and workstations).
In This Section
- About OpenSUSE Leap — the stable, point-release edition
- About OpenSUSE Tumbleweed — the rolling-release edition
- About SUSE Enterprise Linux — the enterprise product
The Short Version
| Distro | Release Model | Best For |
|---|---|---|
| OpenSUSE Leap | Point releases (~annually) | Desktop users who want stability |
| OpenSUSE Tumbleweed | Rolling release | Users who want the latest software |
| SUSE Linux Enterprise | Long-term stable + paid support | Businesses and servers |
If you’re helping a friend who uses SUSE, it’s almost certainly either Leap or Tumbleweed — check which one they have with:
cat /etc/os-release
About OpenSUSE Leap
About OpenSUSE Tumbleweed
OpenSUSE Tumbleweed
OpenSUSE Tumbleweed is a rolling-release distribution. There are no version numbers to speak of — instead of waiting for the next annual release to get new software, packages are updated continuously as upstream projects release them. You’re always running the current version of everything.
This sounds appealing (and it often is), but it comes with a tradeoff: occasionally an update breaks something. SUSE has a trick up its sleeve to make this much less painful than it sounds.
Who Should Use Tumbleweed?
- You want the latest kernel, desktop environment, and application versions
- You’re comfortable troubleshooting the occasional hiccup
- You’d rather have new features today than wait for the next annual release
- You’re a developer who needs recent libraries and toolchains
If you want a “set it and forget it” SUSE experience, Leap is the better choice.
The Superpower: Snapshots with Btrfs + Snapper
Tumbleweed ships with the Btrfs filesystem and the Snapper tool pre-configured by default. Every time you install or update packages, Snapper automatically takes a snapshot of your system’s state before and after.
If an update breaks your system, you can boot into the previous snapshot directly from the boot menu and roll back — no reinstallation needed.
# List your current snapshots
snapper list

# Create a manual snapshot (useful before making big changes)
sudo snapper create --description "before big update"

# Roll back to a previous snapshot (replace N with the snapshot number)
sudo snapper rollback N
sudo reboot
This is one of the best safety nets in Linux. It turns “rolling release” from a gamble into a calculated risk you can always undo.
zypper — Same Commands as Leap
The package manager is identical to Leap. See the Leap page for the full command reference.
sudo zypper ref && sudo zypper update # the standard "update everything" command
Tumbleweed users tend to run this frequently — daily or every few days — to stay current.
YaST
Same as Leap — YaST is available and covers all the same system administration tasks. See the Leap page for details.
Checking Your Version
cat /etc/os-release
# PRETTY_NAME="openSUSE Tumbleweed"
# Note: no version number — that's the point
About SUSE Enterprise Linux
Overview
Other Distributions
Not every Linux distribution belongs to the Debian, Red Hat, or SUSE families. A handful of important distributions grew up independently and have their own ecosystems, philosophies, and communities. You’re less likely to need to help a friend who uses these on a regular basis, but knowing what they are — and what to do if you do encounter them — is genuinely useful.
In This Section
- Arch Linux — the “build it yourself” distro with a devoted following
- Arch Derivatives — Manjaro, EndeavourOS, Garuda
- Gentoo — the source-compiled, maximum-control distro
- Gentoo Derivatives — Funtoo, and Gentoo’s most famous offspring
- Slackware — the oldest surviving Linux distribution
- Slackware Derivatives — Salix and others
The Honest Take
These distributions are not for beginners. They’re for people who have made a conscious choice to trade convenience for control, education, or ideology. The friend who uses Arch chose Arch. The person running Gentoo enjoys compiling their own kernel.
Your job when helping these folks is usually not to fix their distro choice — it’s to help them with the specific thing that broke. The tabs in this section give you enough context to be useful.
Arch Linux
Arch Linux
Arch Linux is a rolling-release distribution built around a single philosophy: simplicity and user control. Where most distros hold your hand through installation with a graphical wizard, Arch starts you at a command prompt and expects you to build your system from scratch.
This isn’t a bug. It’s the entire point. Arch users know their system inside and out because they assembled it themselves.
Who Uses Arch (And Why They’re Like That)
The Arch user base skews toward developers, power users, and people who genuinely enjoy understanding how Linux works beneath the surface. The “btw I use Arch” meme exists for a reason — there’s a culture of pride around it, because it does take real knowledge to set up and maintain.
Your friend who uses Arch probably:
- Has a strong opinion about their desktop environment, window manager, and every other component of their system because they chose each one intentionally
- Updates their system frequently (it’s a rolling release — you have to)
- Is perfectly capable of fixing their own problems most of the time
When they do ask for help, they usually just need a second pair of eyes.
pacman — The Package Manager
Arch uses pacman (Package Manager). The syntax is different from apt or dnf but the concepts are the same.
# Update the package database and upgrade all packages
sudo pacman -Syu

# Install a package
sudo pacman -S <package-name>

# Remove a package (and its dependencies no longer needed)
sudo pacman -Rs <package-name>

# Search for a package
pacman -Ss <search-term>

# Show information about a package
pacman -Si <package-name>

# List installed packages
pacman -Q

# Find which package owns a file
pacman -Qo /path/to/file
The AUR — Arch User Repository
Beyond the official Arch repos, there’s the AUR (Arch User Repository) — a massive community-maintained collection of package build scripts. If software exists for Linux, it’s probably in the AUR.
You don’t use pacman directly to install AUR packages. Instead, you use an AUR helper
like yay or paru:
# Install yay (a popular AUR helper) — first time only
sudo pacman -S --needed git base-devel
git clone https://aur.archlinux.org/yay.git
cd yay
makepkg -si

# After that, yay works just like pacman for both official repos and AUR
yay -S <package-name>        # install from AUR or official repos
yay -Syu                     # update everything (AUR included)
Note: AUR packages are built from source by the community. They’re not vetted by Arch maintainers. Always look at the PKGBUILD before installing from an unfamiliar source.
The Wiki
If you ever need to figure something out on Arch (or any Linux for that matter), the Arch Wiki is one of the best technical resources in the entire Linux ecosystem. Its documentation is so thorough that it’s frequently useful even on non-Arch systems.
Common Arch Survival Commands
# "Something broke after an update" — check recent news first
# Browse https://archlinux.org/news/ before a major update

# Fix a partial upgrade (don't do partial upgrades on Arch)
sudo pacman -Syu  # always upgrade everything together

# Find and reinstall a corrupted package
sudo pacman -S <package-name>

# Clear the package cache (frees disk space)
sudo pacman -Sc
Arch Derivatives
Arch Linux Derivatives
Arch Linux’s philosophy is appealing but the installation process is famously daunting. Several distributions have taken Arch’s rolling-release core and added graphical installers, sensible defaults, and pre-configured desktop environments to make it more approachable.
Manjaro
Manjaro is the most popular Arch derivative. It offers:
- A full graphical installer (no command-line required to get a working desktop)
- Pre-configured desktop environments (GNOME, KDE Plasma, and Xfce are the official editions)
- A slightly delayed update cycle relative to Arch — packages are held for testing before being pushed to users, which catches breaking updates before they hit you
Manjaro uses its own package repositories that mirror Arch but typically lag by 1-2 weeks. This gives the team time to catch and fix issues before they reach users.
# Manjaro's package manager is still pacman, but also comes with pamac (graphical)
sudo pacman -Syu          # update everything
pamac update              # same thing via pamac
pamac install <package>   # install via pamac
Manjaro Hardware Detection (MHWD) is a tool unique to Manjaro that automates driver installation including Nvidia:
# List available drivers for your hardware
mhwd -l

# Install a driver (e.g., Nvidia proprietary)
sudo mhwd -i pci video-nvidia
EndeavourOS
EndeavourOS is much closer to “real” Arch than Manjaro — it uses the actual Arch repositories directly (so you get packages the same day Arch does), adds a graphical installer, and includes a small set of helpful utilities and a welcoming community.
If Arch is the deep end and Manjaro is the shallow end, EndeavourOS is the middle of the pool. Users learn and are expected to understand what they’re doing.
The package manager is standard Arch pacman and the yay AUR helper comes pre-installed.
Garuda Linux
Garuda is an Arch-based distribution with a heavy focus on gaming and aesthetics. It comes pre-configured with:
- Performance tweaks (including the Zen kernel by default)
gamemodeandmangohudfor gaming optimizations pre-installed- A visually striking KDE Plasma setup out of the box
- Their own graphical system maintenance tool (Garuda Assistant)
It uses the Arch repos directly (like EndeavourOS) and comes with paru as the AUR helper.
Common Note for All Arch Derivatives
Because these all use Arch as their foundation, the Arch Wiki applies to all of them. When you hit a problem, search the Arch Wiki first — the answer is almost certainly there.
The main exception is Manjaro: because of its delayed repos and custom tooling (like MHWD), check the Manjaro Wiki for Manjaro-specific issues.
Gentoo
Gentoo
Gentoo is a source-based Linux distribution — which means when you install software, you’re compiling it from source code on your own machine rather than downloading pre-compiled binaries. Every package is built with exactly the USE flags (feature toggles) you specify, optimized for your hardware.
This takes a very long time. Deliberately. That’s the point.
Who Uses Gentoo (And Why)
Gentoo users are a specific breed. They value:
- Maximum control — every software feature is opt-in or opt-out at compile time
- Deep understanding — the process of setting up Gentoo teaches you more about how Linux actually works than almost any other path
- Performance — binaries compiled specifically for your CPU architecture with the features you actually want
- Ideology — some Gentoo users simply value the pure source-code approach
This is not a beginner distribution. The official installation guide is long, detailed, and requires you to understand what you’re doing at every step. It is, however, one of the best educational experiences Linux has to offer if you’re willing to invest the time.
Portage and emerge — The Package System
Gentoo uses Portage as its package management system, and emerge as the command to
interact with it.
# Sync the portage tree (update the list of available packages)
sudo emerge --sync

# Install a package
sudo emerge <category/package-name>
# Example:
sudo emerge www-client/firefox

# Uninstall a package
sudo emerge --depclean <package-name>

# Update all installed packages
sudo emerge --update --deep --newuse @world

# Search for a package
emerge --search <term>

# Check what would be installed/changed without doing it
sudo emerge --pretend <package-name>
Note the category prefix (www-client/, dev-lang/, etc.) — Gentoo organizes packages
into categories. You can usually omit the category if the name is unambiguous.
USE Flags
USE flags are the feature flags that control what gets compiled into your packages. They’re
set in /etc/portage/make.conf and can be set per-package in /etc/portage/package.use.
# Example make.conf USE flags
USE="pulseaudio X gtk -kde -qt5"
# The - prefix disables a flag
Changing USE flags and then updating your system will recompile affected packages. This is normal. It takes a while. Get comfortable with that.
The Honest Take
If your friend uses Gentoo, they are almost certainly more capable of solving their own problems than you are of diagnosing them remotely. What they often want is a sounding board rather than a solution. The Gentoo Wiki and Gentoo Handbook are both exceptional resources and are almost always the right place to start.
Gentoo Derivatives
Gentoo Derivatives
Gentoo has a small but notable family of related distributions, and one very famous distant relative you almost certainly already use.
Funtoo
Funtoo is a Gentoo fork created by Daniel Robbins — the original creator of Gentoo himself. After stepping back from Gentoo’s governance, Robbins started Funtoo with the goal of improving on Gentoo in a few specific ways:
- Faster sync via Git (rather than Gentoo’s rsync-based tree)
- Better out-of-the-box defaults for desktop use
- Some built-in opinionated decisions to reduce the configuration burden
From a practical standpoint, Funtoo is very similar to Gentoo — it uses Portage and emerge,
the same USE flag system, and the same source-compilation model. If you know Gentoo, you know
Funtoo.
ChromeOS — Gentoo’s Most Famous Offspring
The most widely used Gentoo derivative is one you’ve almost certainly encountered: Google’s ChromeOS, the operating system that runs on every Chromebook.
ChromeOS uses Portage (Gentoo’s package system) under the hood for its build system,
and the underlying OS is heavily derived from Gentoo. You won’t be running emerge on a
Chromebook in normal use — the ChromeOS shell is locked down — but the heritage is real.
If you use a Chromebook with Linux (Crostini) enabled, you get a Debian container inside ChromeOS for development work.
Sabayon (Historical)
Sabayon was a user-friendly Gentoo derivative that aimed to provide pre-compiled binaries for common software while still allowing Portage under the hood. It was discontinued in 2021. If you encounter references to it, that’s the context.
Slackware
Slackware
Slackware is the oldest Linux distribution still in active development, first released in 1993 by Patrick Volkerding. It predates the Debian and Red Hat families. Many distributions (including early versions of SUSE) were originally built on top of it.
It has changed remarkably little in 30 years. That’s a feature, not a bug.
The Philosophy
Where Debian and Red Hat aim to be user-friendly and Arch aims for minimalism with good tooling, Slackware aims for something different: Unix-like simplicity and stability, even at the cost of convenience.
The most immediately noticeable consequence: Slackware’s package manager does not handle dependencies automatically. You install what you want, you track what it needs, and if something is missing, the error message tells you. You then go find and install that missing thing yourself.
To experienced Unix administrators, this is fine — they know their systems and they know what they’re installing. To everyone else, it feels like the installer is being hostile. It’s not. It just respects your ability to figure it out.
Who Uses Slackware
Slackware users tend to be long-time Linux/Unix veterans who:
- Value the “closest to Unix” experience available in a mainstream distro
- Have been using it since the 90s and see no reason to change
- Work in environments where predictability over decades matters more than new features
- Are deeply suspicious of package managers that make decisions for them
If you’re helping someone who uses Slackware, they have almost certainly been using Linux longer than you have. Act accordingly.
pkgtool — The Package System
Slackware uses a simple set of package management tools:
# Install a pre-built Slackware package (.tgz or .txz)
sudo installpkg package-name.tgz

# Remove an installed package
sudo removepkg package-name

# Upgrade an existing package
sudo upgradepkg package-name.tgz

# List all installed packages
ls /var/log/packages/

# Find what package a file belongs to
grep -r "/path/to/file" /var/log/packages/
There are no official dependency-resolving tools in base Slackware. Community tools like slackpkg (for official repo updates) and sbopkg (for SlackBuild scripts from SlackBuilds.org) fill this gap somewhat:
# slackpkg — update/install from official Slackware mirrors
sudo slackpkg update
sudo slackpkg upgrade-all
sudo slackpkg install <package>

# sbopkg — install software built from SlackBuilds.org scripts
sudo sbopkg -i <package>
SlackBuilds.org
SlackBuilds.org is Slackware’s equivalent of the AUR — a community-maintained collection of build scripts for thousands of packages not in the official Slackware repos. Unlike the AUR, these are build scripts, not binary packages, so you compile them locally.
The Honest Take
If your Slackware-using friend has a problem, the Slackware Documentation Project and the LinuxQuestions.org Slackware forum are the go-to resources. The community is small but experienced and surprisingly helpful.
Slackware Derivatives
Slackware Derivatives
Slackware’s age and simplicity have inspired a number of spin-offs, most of which add the dependency management and user-friendliness that base Slackware deliberately omits.
Salix OS
Salix is the most actively maintained Slackware derivative, built with one key philosophy: one application per task. It ships with a minimal, curated set of applications and avoids the “install everything” approach of some distributions.
The major improvement over base Slackware is proper dependency resolution — Salix’s
package manager slapt-get handles dependencies automatically.
# Update the package list
sudo slapt-get --update

# Install a package (with dependency resolution)
sudo slapt-get --install <package>

# Upgrade all installed packages
sudo slapt-get --upgrade

# Search for a package
slapt-get --search <term>
Salix also includes GSlapt, a graphical front-end for those who prefer not to use the terminal. It fully compatible with Slackware packages and SlackBuilds.
Porteus
Porteus is a fast, portable Slackware derivative designed to run from a USB drive or other removable media. It’s small (under 300MB), boots quickly, and is modular — you can add and remove software components without reinstalling.
It’s not really meant to be installed to a hard drive as a primary system. It shines as:
- A bootable live environment for system recovery
- A portable OS you carry with you on a USB stick
- A lightweight system for older hardware
A Note on Slackware’s Influence
Many historically important distributions trace their lineage to Slackware, including early versions of SUSE (which started as a German adaptation of Slackware before becoming its own thing). Its influence on the Linux ecosystem is larger than its current user base suggests.
Errata
Errata
Under Construction
nothing to see here just yet